52 Week Mini Art Card/Tag Challenge

Copywrite / Privacy

Thursday, 31 August 2023

Lavinia Stamps "Everlee on the swing bed" tag


More early morning play, this time a tag using Lavinia Stamps.

I used a manila coloured tag for the base, adding "Saltwater Taffy" and "Weathered Wood" Distress Oxide Inks, layering the colours, then drying then laying more colour on top, to get some depth.

Once dry, I used Versafine Clair "Shady Lane" green ink to stamp the Lavinia Stamps "Medium Swing Bed".  I used the same ink to stamp the "Mystic Swirls" and also to ink the edges of the tag.

Next, I used Versafine Clair "Morning Mist" grey ink to stamp the Lavinia "Star Cluster" around the swing bed.  I was then able to stamp the fairy "Everlee" using Versafine Clair "Twilight" dark blue ink.

I added touches of silver glitter pen, gold shimmer pen and finally dots of "White Opal" Ranger Liquid Pearls to areas of the swirls.

Clarity Stamps "Leafy Swirl" Stencilled Birthday Card


For some reason I couldn't sleep, so was up 4am and decided to craft. I've used four Clarity stencils and two of their stamp sets for this card.

I started by masking of the vertical and horizontal edges of the right hand side of the card using a low tack masking tape.  I used "Sunflower" Archival ink through three of the rectangles in the Clarity "Abstract Squares" stencil.

I then used "Tea Rose" Archival Ink through the striped section of the Clarity "Birds Decorative Panel" stencil in two different directions over the yellow rectangles.

Next I used "Shadow Grey" Archival Ink through the Clarity "Zig Zag" stencil fading the colour out towards the left hand side of the card.

I used two shades of Ranger Archival Inks (Cornflower first and then Vivid Chartreuse) through the Clarity "Abstract Droplets" stencil, again fading the colour out towards the left hand side of the card.

I stamped the Clarity "Leafy Swirl" and the "Entwined Sentiment" using Versafine Clair "Twilight" dark blue ink.

Finally, adding a few finishing touches, by using a gold shimmer gel pen to go around the edges of the droplets and adding some white "Enamel Accents" to break up the colour a little.


Wednesday, 30 August 2023

Hobby Art "Town House Scene-Its - CS010D" Christmas Card


I'm on a roll with my third card today, this time I've swung straight in to Christmas!

I stamped the trees and the house using two shades of Versafine Clair inks:  Morning Mist and Shady Lane, using second generation stamping. I've used two Hobby Art stamp sets.  One is called "Town Houses CS0101D", sadly I don't know the name of the other set as I've had it for a very long time.

I coloured the image using various shades of Distress Oxide Inks, applied with a paint brush.  The colours I used were". Stormy Sky, Tumbled Glass, Antique Linen, Weathered Wood, Lost Shadow and Festive Berries.

I used Dr PH Martin's Bleed Proof white paint to create the snow using a fan shaped paint brush.  I also added touches of white gel pen to the trees. Finally, stamping the sentiment, using Versafine Clair "Morning Mist" grey ink.

Clarity Stamps "Just for you" Kiss Stamps Card


A quick clean looking card using a stencil and stamp from Clarity Stamps. 

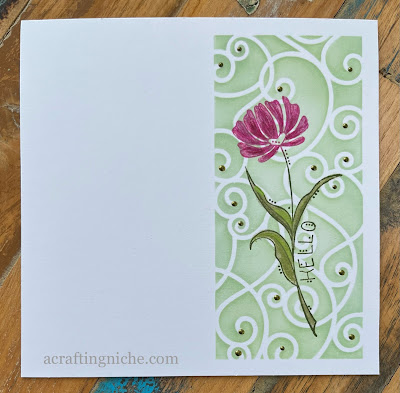
I used one of the panels on the Clarity Stamp "A5 Birds Decorative Panel" stencil with an Artistry Ink to create the swirl panel.

Over the top of the panel, using Versafine Clair "Shady Lane" green ink I stamped the flower, which is part of the Clarity "Just For You" Kiss stamp set.  I then coloured the flower using Derwent Inktense pencils, finally adding green dots using Ranger "Avocado" Liquid Pearls ink.

Sweet Poppy Stencils "Autumn Leaves" Card


This morning I've been playing with my Sweet Poppy Stencils and stamps to make this card.

I started by stamping the leaves, which is part of the Sweet Poppy Stencils stamp set called "Autumn Leaves".  Stamping in second generation stamping of Versafine Clair "Acorn" brown ink.

I then used a selection of colours (Sunflower, Orange Blossom, Coffee, Pink Peony, Plum and Peat Moss) of Ranger Archival Inks through the Sweet Poppy "Harmony Backplate Stencil".  Blending the colours out from the middle towards the edges, but retaining white space to allow the eye to settle.

I coloured the leaves using a selection of Derwent Inktense pencils, a 2B pencil and a gel pen.

Over the top of the image, I lay the Sweet Poppy "Grid Plate Stencil" and applied "Prickly Pear" Ranger Archival Ink through the stencil with a blending brush.  This provided the extra texture.

Laying a piece of paper over the leaves, I used a fan shaped paint brush to splatter white paint over the surface of the card, I used Dr. PH Martins Bleed Proof paint.

I then mounted the card on to a kraft card blank, finally stamping the "Follow Your Dreams" sentiment (also part of the Sweet Poppy "Autumn Leaves" stamp set), using Versafine Clair "Chianti" dark red ink.

Tuesday, 29 August 2023

Netgalley Book Review: A Winter Wedding At Starcross Manor by Christie Barlow


I was very fortunate to read this book prior to the publication date, reviewing it on Netgalley.

"A Winter Wedding at Starcross Manor" is book twelve in Christie Barlow's "Love Heart Lane" series.  I have read each of the books and this latest one definitely didn't disappoint and I think may be my favourite of them all!

The style of writing just flows beautifully.  A wonderfully descriptive story line, puts you right in the snowy village of "Heartcross" with fabulous "Christmassy" vibes.  I just couldn't get enough of this story line and really hope that there will be another book in the series.

A bit about the story:  Fashion Designer Libby Carter, has been offered a top job in New York and has a few weeks to herself before she packs up her life.  Her brother Flynne, who owns "Starcross Manor" calls upon her help to help arrange a high profile wedding, which would make Starcross Manor "The Scottish wedding destination"! A string of events means that plans tumble like domino's for Libby but the wedding photographer Guy is there to help out at the winter wedding of the century.

Thursday, 24 August 2023

Sweet Poppy Stencils "Autumn" Card


I was up early this morning making this Autumn card - I think the drizzly weather we've had the last day or so is rubbing off on me!

I started by positioning the Sweet Poppy "Rose Aperture Stencil" over a piece of white card and going around the edges lightly with "Peat Moss" Ranger Archival Ink.  

Next, I lay the Sweet Poppy "Plaid Back Plate Stencil" over the top of the leaf stencil, securing with low tack tape.  I then applied several shades of Ranger Archival Ink through the stencil using a blending brush.  The colours I used were : Tea Rose, Monarch Orange, Fern Green and Sepia.

Removing the Plaid stencil, I then lay the Sweet Poppy "Maple Leaf Stencil" over the top, using "Plum" Ranger Archival Ink through the stencil with a blending brush.

I used Versafine Clair "Chianti" dark red ink, to stamp the Autumn verse, which is part of the Sweet Poppy "A6 Season" stamp set.  Finally, adding extra detail using a gold metallic pen.

Wednesday, 23 August 2023

Lavinia Stamps "Fairy Towns" sign post tag


There are only one or two Lavinia Stamps in my stash that I have actually never used.  The sign post stamp was one of those, so I decided to make a tag, just to use it.

I decided to use a page from an old road atlas as the base for the tag, sticking it on to a manila tag for strength.  I used several green, browns and dark red inks to dull down the look of the atlas page.

Using Versafine Clair "Chianti" and "Pinecone", I stamped the Lavinia Stamps "Maple Leaves", the "Large Compass" and the "Fairy Towns" sign post.

I stamped the sign post again on a piece of card and coloured it with "Antique Linen" Distress Oxide Ink before fussy cutting the sign post and sticking it on to the tag. Because the surface of the atlas page was coated in something, the ink seemed to take longer than normal to dry! I then mounted the tag on to a dark red card base.

I added touches of details and highlights, using a metallic gold pen to areas of the leaves and the compass.  I also edged the tag in the gold ink pen too.

Funky Fossil Designs "Surf's Up" Card


A very quick CAS card this morning, after the more busy cards I have made of late.

I've used the Funky Fossil Designs "Surf's Up" stamp set, stamping the figure and the sentiment in Versaine Clair "Warm Breeze" ink.

I used "Garden Patina" Ranger Archival Ink through the Funky Fossil Stencil called "Waverider" stencil.  Finally, adding a few touches of silver glitter pen around the end of the surf board.

Tuesday, 22 August 2023

Sweet Poppy Stencils "Daisy" Birthday Card


I raided my file of previously made backgrounds and came across a Brusho background that I felt would work with a stamp I had in mind.  This card is the result.

Using the Brusho background, I stamped the Sweet Poppy Daisy from their "A5 Daisies" stamp set, using three Versafine Clair inks (Acorn, Summertime and Tulip Red).

I then stamped the sentiment, which is part of the Sweet Poppy stencil stamp set called "Hugs and Kisses" in Versafine Clair "Warm Breeze" ink.

I used Derwent Inktense pencils to colour the daisy, using lots of different shades of red, orange and yellows.  I then used a metallic gold gel pen and a gold shimmer pen to add extra detail to the petal area.  I wasn't totally happy with it, so added some dots of red, yellow and orange Posca Pens to the petals too.

Clarity Stamps "Birds Decorative Panel" Card


Here's another card using the Clarity "Garden Birds" stamp set.

I used "Vibrant Fuchsia" and Forget-Me-Not" Archival Inks through the Clarity Stamps "A5 Birds Decorative Panel Stencil", to create the area on the right hand side of the card.

Using Versafine Clair "Twilight" dark blue ink, I stamped the bird from the Clarity "A5 Garden Birds" stamp set and the  greeting from the Clarity "Congratulations Occasions Sentiment" stamp set.

Monday, 21 August 2023

Clarity Stamps "Garden Birds" Card


I've used Clarity Stamp products for this card. 

Using the Clarity Stamps "A5 Garden Birds stamp and mask set.  I stamped the bird in the bottom left hand corner, off the page using Versafine Clair "Twilight" dark blue ink.  

I covered the stamped bird with the mask and then lay the Clarity Stamps "Woodland Birds Stencil" over the top, applying four shades of Ranger Archival Inks through the stencil using a blending brush.  The colours I used are Tiger Lily, Vibrant Fuchsia, Cactus Flower and Majestic Violet.

Removing the stencil and the mask, I then started to colour the bird, using three shades of Derwent Inktense pencils.  I used Mango, Fuchsia and Violet, along with a couple of metallic gel pens.

I inked the edges of the card with Versafine Clair "Twilight" ink and then mounted it on to a piece of white card, before mounting it on to a dark red card blank.

Sizzix / Stampin' Up "Pretty Pines" snowflake Christmas card


I had an idea in my head about a Christmas card, which I had to try out.  This card is kind of what I had thought of.

I started with a square kraft card blank.  I used the Funky Fossil Designs "Snowflake die", cutting it in thin white card.  Once cut, I coated the snowflake in "Crystal" stickles to give a lovely sparkle and set aside to dry.

I had a mega cutting session using my Sizzix Big Shotm cuttine elements from the Sizzix / Stampin' Up "Pretty Pine Thinlits" dies, using different coloured shades of green and brown cardstock.

I used wet glue to stick the snowflake on to the card blank.  I then started to build up the foliage on the left hand side of the card.

I used Dr PH Martin's white bleed proof ink, slightly diluted, using a fan shaped paint brush to splatter the white across the card, to replicate snowflakes.

I had die cut the word "Merry" in a lovely deep red shade, but it kind of got lost on top of the snowflake, which is where the vision in my head, differs from what I have made.  It didn't seem to make a difference where I positioned the word, it just didn't work.  So instead, I stamped "Season's Greetings", part of a Clarity Stamps set called "Christmas Celebration Words" in Versafine Clair "Chianti" dark red ink.  I then die cut it in to a banner shape, tucking one end below some of the foliage.

Finally, I added "crystal" stickles around the sentiment and added "Ruby Red" Liquid Pearls to the foliage to replicate berries.

Sunday, 20 August 2023

Cardio-Majestix "Field Florals" Artist Trading Card


I came across a small piece of white card, from a previous project that was really too small to do much with, but it was just big enough to make and ATC (Artist Trading Card).  ATC's measure two and a half by three and a half inches in size.

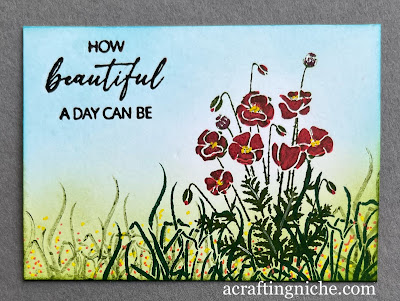
Using Versafine Clair "Shady Lane" I stamped the poppies, which are part of the Cardio-Majestix "Field Florals" stamp set.  I then stamped the grasses, in Versafine Clair "Rain Forest" and "Shady Lane" (in both first and second generation stamping).  The grasses are part of another Cardio-Majestix stamp set, this one was called "Still Waters".

I coloured the flowers with a red Posca Pen, adding small dots of orange and yellow Posca Pen to replicate small flowers in the grasses.  I also used a white gel pen around the flower heads.

Finally, I stamped the sentiment, which is part of a Penny Black clear stamp set called "Not Older, Better", stamped in Versafine Clair "Nocturne" black ink.  

Cardio Majestix "Last Orders" Birthday Card


I'm trying to get ahead of myself making cards for birthdays coming up in the next couple of months.

For this card, for a male friend, I started with using the Sweet Poppy "Circle Aperture Stencil" with "Shadow Grey" and "Forget-Me-Not" Ranger Archival Inks to create the coloured background circle.

Initially, I was thinking I would make a clock, using the bottles as the numbers, but decided against that idea.  I used a small bottle stamp from the Cardio-Majestix stamp set called "Last Orders" stamped in Versafine Clair "Green Oasis" ink.

Next, using Versafine Clair "Nocturne" black ink, I stamped the "Happy Birthday" words using the Hobby Art Stamp set called "Greetings For Friends - CS158D".

I mounted the card on to co-ordinating green card and then on to a card blank, finally adding a spotty background using a silver glitter Unibal Signo pen.


Saturday, 19 August 2023

Stampers Anonymous "Perspective" Happy Birthday Beautiful Card


This card came together really quickly, so quickly I wasn't really sure where I was going with it and thought it can always go in the bin if ending badly.  Thankfully, it turned out ok.

It started with me stamping the butterfly, part of the Stampers Anonymous "Perspective - CMS213" stamp set, in Versafine Clair "Nocturne" black ink, then coating it in Wow! Embossing Clear embossing powder and heat setting.  I then stamped the butterfly again on a piece of copy paper, fussy cutting the shape to create a mask, which I positioned over the heat embossed butterfly.

I lay the Funky Fossil Designs ""Beauty In Profile" stencil over the top of the butterfly and applied Versafine Clair "Warm Breeze" ink through the stencil.  I removed the stencil then applied "Lost Shadow" Distress Oxide Ink through the Funky Fossil "Micro Squares" stencil to fill the white areas.

I removed the stencil and the mask, then inked the edges of the card, first with "Warm Breeze" Versafine Clair ink and then with "Nocturne" black ink.  I then mounted the card on to black card and then on to a card blank.

I used a Derwent Inktense pencil in the shade of "Malibu" diluted and applied with a brush to areas of the butterfly.  I then used a white gel pen to go round the edges of the blue stencilled area.  I added black dots of Ranger "Enamel Accents" below the butterfly,

Finally, I used a Tim Holtz "Idea-ology" word sticker from the "Big Chat" book saying "Beautiful". Then using Versfine Clair "Nocturne" black ink, stamped the words "Happy Birthday" using a stamp from the Simon Says Stamp set called "Tiny Words - Birthday".

Friday, 18 August 2023

Sweet Poppy Stencils " Botanicals Holly Sprigs" Christmas Card


Another CAS card, this time I'm fast forwarding to the festive season with a Christmas card.

I used the Sweet Poppy "Aperture Circle Stencil" with "Library Green" Ranger Archival Ink to create the shaded partial circle.

I used Versafine Clair "Rain Forest" dark green ink to stamp the Sweet Poppy "Botanicals Holly Sprigs" stamp.  I coloured the leaves using three shades of Derwent Inktense pencils, applied with a brush.  I added "A Wink of Stella" to the leaves to give a beautiful subtle gold shimmer to them.

A red Posca Pen was ideal for colouring the berries.  I added white highlights with a gel pen to the leaves and the berries.

Next, I stamped the sentiment, which is part of the Sweet Poppy "Festive Phrases" stamp set, stamped in Versafine Clair "Tulip Red" ink.

Finally, I added splatters of white paint using a fan shaped paint brush to replicate snow flakes.

Stampers Anonymous "Flower Jar CMS297" Card


I was up at silly 'o clock again this morning.  I was feeling too hot to sleep, so decided to get up and make this card.

I decided to use a Stampers Anonymous stamp set, I've not used them for ages, opting for the red rubber cling set called "Flower Jar - CMS297".

I used two shades of Versafine Clair inks (Warm Breeze & Morning Mist), both stamped in second generation stampin as I didn't want hard solid lines for the glass jar.

Next I stamped the flower, using Versafine Clair "Shady Lane" for the stem and "Summertime" for the flower head, again stamped in second generation stamping as I wanted the whole thing to look light and delicate.

I coloured the flower with Derwent Inktense Pencils, applied with a paint brush, I also extended the stem of the flower towards the base of the jar.

I used "Weathered Wood" Distress Oxide ink and a 2B pencil to ground the jar.

Using Versafine Clair "Morning Mist" grey ink, I stamped the "Thinking of you" greeting, which is part of the Simon Says Stamp "Tiny Words" sentiment stamp set.

I then used "Lost Shadow" Distress Oxide ink, through the Funky Fossil "Micro Dots stencil" just around the main stamped area.  Finally adding some touches of white gel pen as highlights.

Thursday, 17 August 2023

Visible Image "Daisy Grunge" Smile Card


While my Visible Image stamps and stencils were out, I decided to have a further play, making this card.

To start with, I used a white card, laying the Visible Image "Daisy Daisy" stencil over the top and applying two shades of Ranger Archival Inks (Cornflower Blue and Garden Patina) through the stencil with a blending brush.

Using Versafine Clair "Blue Belle" ink, I stamped the large daisy from the Visible Image "Daisy Grunge" stamp set.  Using the same ink, I stamped the solid daisy from the Visible Image "Imperfection Is Beauty" stamp set.

Between the flowers, I stamped the word "Smile" in Versafine Clair "Nocturne" black ink, which is also part of the Visible Image "Daisy Grunge" stamp set.

I used three shades of Van Goch Pastel Pencils to colour the petals of the large daisy, using an orange and a yellow colour to colour the middle of the flowers, adding touches of yellow and orange Posca Pen dots to the same area.  I used a white gel pen to add highlights to some petals and to add some white dots across the card.

Visible Image "Atomic Flower" Birthday Card


I made this quick birthday card this morning, using two shades of Ranger "Archival Inks" (Chrome Yellow and Tea Rose), through the Visible Image Stamps "Atomic Flower" stencil. 

I then used Versafine Clair "Nocturne" black ink to stamp the Visible Image "Happy Birthday" sentiment and verse.  Finally, adding some dots using a metallic gold pen.

Wednesday, 16 August 2023

Woodware "Leaf Quartet" Congratulations Card


GCSE exam results are just around the corner and I know a certain young man will have done fantastically well, so I hope I've not jinxed the results by making this congratulations card. 

I've used one of the leaves from the Woodware "Leaf Quartet JGS342" clear stamp set, stamped in Versafine Clair "Green Oasis" ink.  I stamped the leaf again on to a post-it note and then fussy cut it to create a mask and popped it over the original stamped image.

I used low tack tape to mask off the edges of the card, then used Versafine Clair "Warm Breeze" ink through the Funky Fossil Designs "Burlap Texture Background Stencil.

Removing the leaf mask and the low tack tape, I then created a mount in a co-ordinating colour of card, before sticking it on to a card blank.

I used a sentiment from the Funky Fossil Designs "Stripped Back Sentiments" stamp set, with Versafine Clair "Green Oasis" ink for the "congratulations" word.

Finally, I added some dots of white Ranger "Enamel Accents" drifting from top left to bottom right of the card.

Tuesday, 15 August 2023

Lavinia Stamps "Forest Flower" on a stencilled background


A late evening play session, I should really have waited till the morning to take the photograph as the lightling this evening really doesn't do the card any justice.

I started by stamping and heat embossing the Lavinia ""Forest Flowers" using Wow! Embossing "Rich Gold Super Fine" embossing powder. Once heat set, I moved on to the background.

I used the Lavinia Stamps "Tall Leaf Mask" with several shades of Ranger Archival Inks (Sky Blue, Garden Patina, Manganese Blue, Library Green and Majestic Violet).

I then used the Lavinia Stamps "Honeycomb Stencil" with  "Sky Blue" Archival Ink around the edge of the leaf.  

Next I used one of the Lavinia Stamps "Hill Masks" to create lines of colour around the leaf using a couple of shade of Ranger Archival Ink:  Garden Patina and Manganese Blue".

In the top left of the card, I stamped teh "Just for you" sentiment, which is part of the Lavinia Stamps "Heartfelt Verse" stamp set, stamped in Versafine Clair "Morning Mist" grey ink.

I added touches of colour to the flowers using a selection of coloured gel pens.


Clarity Stamps "Fly Away" Hang In There Card


Back from the caravan and of course, I couldn't wait to get cracking on my next inky project. 

I found a small inky background I'd made a long time ago, I don't recall making it and I can't even guess what inks I might have used either, but that's what I used for the base.

At the top of the background, I lay the Clarity Stamps "Sunshine Stencil" over the top and through the gaps I applied a white Derwent Inktense pencil tp lighten areas.  I lifted the stencil, then rubbed the pencil areas with my finger, to blend the colour to give the impression of rays.

On the lower section of the card.  I lay the Clarity "Zig Zag" stencil over the top and applied "Vivid Chartreuse" Ranger Archival Ink through the stencil to give a slight pattern.

Next I stamped the flying figure, using Versafine Clair "Twilight" dark blue ink with the Clarity Stamps "Fly Away A6 stamp set".  I used the same stamp set for the tree tops, but stamped in first and second generation stamping using Versafine Clair "Shady Lane" green ink.

I inked the edges of the card using "Shady Lane" and "Warm Breeze" Versafine Clair inks, applied with a finger dabber.  I then used yellow and orange Posca Pens to give the impression of flowers at the base of the card.

Finally, I added a sentiment, which is part of the Simon Says Stamp set called "Tiny Words" stamped in Versafine Clair "Twilight" dark blue ink.

Thursday, 10 August 2023

Hobby Art Ltd "Abstract Flowers" Birthday Card


I'm still rummaging through my stamps and came across my box of Hobby Art stamps.  They have some lovely designs and I don't use them often enough, so addressed this by making this card.  It is so not my usual style, but I rather like it.

I started by using Versafine Clair "Warm Breeze" ink to stamp the Funky Fossil Designs "A7 Vintage Script" stamp in a few areas across the central area of the card.  I then used two shades of Ranger Archival Inks (Forget-me-not and Library Green) to add some colour to the surface. 

I decided it needed something else, to used more "Library Green" Archival Ink through the Funky Fossil "Abstract Pattern Stencil".  I then dragged a finger dabber with Versafine Clair "Twilight" dark blue ink, along the surface of the piece. I then mounted the coloured piece of card on to a white piece of card and then on to a navy blue card, before mounting it on a white card blank.

On a white piece of card, I stamped three of the flowers from the Hobby Art Ltd stamp set called "Abstract Flowers", stamping them in Versfine Clair "Twilight" Dark Blue ink.  I decided at this stage to add a couple of round doode looking shapes to the background piece too.

I fussy cut the three flowers, using a wet glue on the underside of the middle of the flowers to glue the three flowers.  I then used a yellow and orange Posca Pen to colour the middle areas of the flowers.  Still not happy with that, I used "Crystal" stickles with my finger tip to cover the central area of the flowers too.

Finally, I used a Waffle Flower stamp from their "Oversized hello" stamp set for the "Birthday Girl", stamped in Versafine Clair "Twilight" ink.


Wednesday, 9 August 2023

Crafty Individuals Gift Tag


I was tidying and sorting some of my stamps today and came across a box of Crafty Individuals stamps which I have not used close to a couple of years.  They're lovely stamps and it was great to re-discover them.  I decided to make a quick gift tag before bed time. 

I stamped the image on to white card using Versafine Clair "Morning Mist" grey ink.

I coloured the stamped image using four shades of Distress Oxide Inks (Salvaged Patina, Dusty Concorde, Lost Shadow and Mowed Lawn), applied with a paint brush.  I then added touches of yellow Posca Pen to the centre of the flower, adding highlights with a white gel pen and silver dots using a Unibal Signo pen.

I mounted the stamped area on to a piece of dark grey card and then on to a blank tag, finishing by threading a co-ordinating ribbon through the hole.

Get Well Soon Card


Over the past three years, my friend has had an awful run of bad luck with her health and has also lost some dear relatives too.  This weekend she was taken in to hospital again for an operation, so I've made her this card.

I've used a selection of products from different suppliers for this card. 

I started with a piece of white card using three shades of Ranger Archival Inks ( Sunflower, Tea Rose and Vibrant Fuchsia), through the Sweet Poppy Stencil called "Harmony Backplate Stencil" to create the backgroud design.

I used Versafine Clair "Twilight" Dark Blue Ink to stamp the Crafty Individuals CI-493 "Wild Flowers and Ferns" stamp over the stencilled background.  I then mounted the card on to dark blue card stock and then on to a white card blank.

The sentiment is from a Funky Fossil Designs stamp set called "Stripped Back Sentiments", which I have also stamped in Versafine Clair "Twilight" dark blue ink.

Patchwork Lap Quilt Update


You may remember a couple of weeks ago, I mentioned that I had purchased a small quilting kit at a charity shop.  I really enjoyed hand quilting it, so decided to pull out a UFO (unfinished object) from the depths of the cupboard, which will eventually be a lap quilt.


The history of it so far: about seven years ago, I cut and machine pieced the top of the quilt.  It then got put away in a cupboard.  A few years on, I took it out and sandwiched the pieced top, the wadding and the backing together by tacking/basting the layers together.  It got put away again.

Today, the lap quilt saw the light of day again. I decided to draw on the quilting designs.  I used a  large and medium size glass pudding basin and a Pringles lid to draw the circles on to the fabric.

Now all that is left to do is the little, tiny job of hand quilting... wish me luck.  It could take some time, but I will hopefull get it done over the coming cooler months.


Tuesday, 8 August 2023

Planning forward for the 52 Week Mini Art Card/Tag Challenge 2024


I spent this morning, writing up notes for the 2024 tag challenge in my new project book.

I don't know about you, but I get a tiny bit excited about defacing a brand new notebook - odd I know!

I like to be organised, some have said I have a touch of OCD about things and I have to agree with them ðŸ« . However, I find in this instance it helps to plan forward and get things in writing.

Once it's down in writing, it's the law as far as I'm concerned!

I've made really good progress too. When I think of possible prompts/themes for the challenge, I make a note in my phone. I've transferred those lists into the first section of my note book. I've added a print out of the 2024 calendar to the inside cover of the book to refer to too.

In the second section I've allocated a month per page, detailing the dates of the Sundays and the week numbers against them. I've then referred to the prompt/themes list and matched them to the dates, adding a note of the week number against each prompt so I know when it's being used, I guess you'd call it cross-referencing. My high-lighting pen has been very busy ðŸ™‚

I now have a prompt against each of the 52 weeks of 2024, with likely enough prompts left over to do 2025 too.

Now all that is left for me to do, regarding the challenge, is to start making the tags, writing notes of what I've used, so that I can schedule social media posts closer to the time.

I feel quite accomplished having done this today! It took all morning, but well worth the time spent to be where I am now.

Sweet Poppy Stencils "Sending Hugs" Anchor Card


This is my afternoon make.

I've used two shades of Ranger Archival Inks (Shadow Grey & Garden Patina) through the Sweet Poppy "Symphony Backplate stencil" in the bottom right corner, fading the pattern colour out to the top left.

I used two shades of Versafine Clair inks (Morning Mist and Warm Breeze) to stamp the anchor and the "sending hugs" sentiment, both are part of the Sweet Poppy "A5 Octopus" stamp set.

I used two shades of Derwent Inktense pencils (Neutral Grey and Dark Mink), applied with a paint brush to colour the anchor.  I added a few touches of white gel pen to highlight areas of the anchor, then gave a few strokes of "A wink of Stella" to give the anchor a lovely subtle gold shimmer.  Finally, I added three dots of white Ranger "Enamel Accents".

Monday, 7 August 2023

Funky Fossil "Beauty's Garden" Tag


Tidying up one of my craft shelves, I came across some patterned paper off-cuts from a Funky Fossil paper pad called "Neutrals".  I challenged myself to use them up, rather than putting them away again, so made this tag. 

I'm not very good at informal style of crafting, so stuck the paper on to the tag base without trying to think about it too much. I then splattered metallic gold paint across the surface of the tag and set aside to dry.

I inked the edges of the tag with Versafine Clair "Shady Lane" green ink and then "Nocturne" black ink.

Using the Funky Fossil Designs "Beauty's Garden" stamp set, I stamped the urn and the sentiment on to a piece of cream coloured card stock using Versafine Clair "Nocturne".  I fussy cut the urn and then inked the edges of it in black.  Using foam pads, I positioned it on to the tag

I die cut the sentiment in to a banner shape, giving it a light coating of Versafine "Shady Lane" green ink before sticking it in to position on the tag.

I used a We Are Memories "Ring Hole re-inforcer" to cut three circles in black card and stiuck those on to the tag too.

Finally, I mounted the tag on to black card, going around the edge with a gold shimmer pen.  I also added touches of gold metallic pen to the urn and also added some dots of gold coloured Ranger Liquid Pearls too.


Penny Black Stamps "Owl Be Yours 40-045" Card


I tend not to use "cutesy" style stamps in my crafting these days, but while tidying my stamps came across this Penny Black Stamp that I thought would be ideal for an engagement or anniversary card.

I stamped the Penny Black "Owl Be Yours 40-045"  cling stamp in Versafine Clair "Morning Mist" grey ink.

To colour the image, I used an assortment of colours of Derwent Inktense pencils, applied with a paint brush.

I used Ranger Archival Ink "Forget-Me-Not" blue ink (which handily matched the Derwent Inktense Blue) through the Funky Fossil Designs "Micro Dots" stencil around the edge of the heart.

Finally, using Versafine Clair "Morning Mist" grey ink, I stamped the "Congratulations" sentiment, which is part of the Simon Says "Tiny Words" stamp set.  I added a few touches of white and gold gel pen, along with some dots of white "Ranger Enamel Accents".

Gummiapan Balloon on Trellis Birthday Card


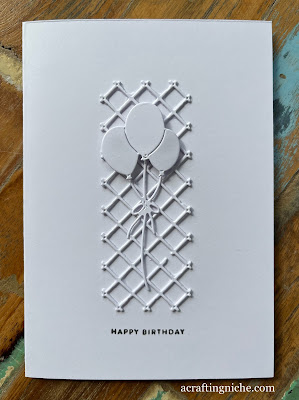
A very clean and simple card from me this morning using a couple of Gummiapan dies. 

I used my Sizzix Big Shot to die cut the "Trellis" and the "Balloons" dies from Gummiapan.

I cut two of the trellis and glued the two together and glued on to the card. 

Next I stamped the sentiment, which is part of Simon Says Stamp "Tiny Words - Birthday", stamped in Versafine Clair "Morning Mist" grey Ink. (I did this now as the balloons were going to be raised and may make stamping more difficult).

I then glued the balloon strings into position.  Using sticky foam pads, I added the actual balloons to five dimension to them.

And that's it.  A really quick card to make.

Sunday, 6 August 2023

Visible Image "Where Dreams Tag You" Card


After the clean lines of the previous cards, this one is a bit more busy.

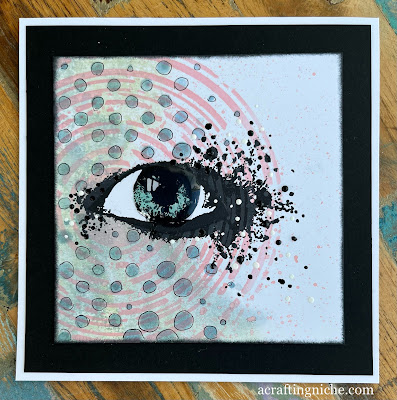
I started by using two shades of Distress Ink, using "Old Paper" and "Weathered Wood", slightly spritzed on my craft mat and then dragging the card through the ink on the left hand side only.

Once dry, I used the Visible Image "Supernova Stencil" with "Saltwater Taffy" Distress Ink, to create the circular shape.

I then used Versafine Clair "Nocturne" black ink to stamp the eye, which is part of the Visible Image "Where Dreams Take You" stamp set.

Next, I added the dots, using the Visible Image "Two Tone Stencil" with "Sky Blue" Archival Ink.  I then went around each circle with a black fine line pen to accentuate them more.

Returning to the eye area, I added colour to the eye itself by using "Salvaged Patina" Distress Oxide Ink, then coating it with Ranger "Glossy Accents".  

Finally, I added black and white dots around the eye area using Ranger "Enamel Accents", then set to one side till the Glossy Accents had set, which actually took about three hours!

Sweet Poppy "Floral Trellis" Christmas Card


I'm sharing a quick CAS Christmas card.  I really like the simplicity that packs a punch!

I've used the Artistry Ink "Morning Dew" ink through the Sweet Poppy Stencils ""Floral Trellis SP6-149 Stencil" with the Sweet Poppy "Triangle Aperture SP6-125T stencil" to create the tree shape.

I used Versafine Clair "Morning Mist" grey ink to stamp the sentiment, which is part of the Sweet Poppy "Festive Phrases" stamp set.

Finally, I mounted the card onto co-ordinating cardstock and on to a card blank, before adding sticky backed silver gems to the tree area.


Saturday, 5 August 2023

Clarity Stamps "Leafy Swirl" Anniversary Card


After the busy background of the card I made this morning, I've gone for a more CAS look for this anniversary card.

I started by using the large aperture section of the Clarity Stamps "Circle Dots Stencil" applying "Morning Dew" Artistry Ink to a blending brush, lightly creating the softly coloured edge of the circle.

I then used Versafine Clair "Morning Mist" grey ink to stamp the Clarity "Leafty Swirl" flourish and the greeting, which is part of the Clarity "Entwined Sentiment" stamp set.

I used a white pastel pencil to lighten the leaves on the flourish and then a white gel pen to add a little more detail.  Finally, adding some white dots of Ranger "Enamel Accents" around the Flourish area.

Visible Image Stamps "Daisy Grunge" Smile Card


The heavens have opened and it is bucketing it down this morning, so I decided to make a bright card.

For the very base of this card, I spritzed two shades of Distress Inks (Old Paper and Weathered Wood) on my glass mat and then dragged the piece of white card through the inks.  I ran my heat gun over the surface to dry it before moving on to the next stage.

I secured the Visible Image "Distressed Brick Stencil" with low tack tape over the inky background card.  I then applied three shades of Ranger "Archival Inks", through the stencil with a blending brush, using "Prickly Pear", "Fern Green" and "Monarch Orange" colours.

Lifting the stencil, I then positioned the Visible Image "Honeycomb Hex" stencil and applied some "Monarch Orange" and "Shadow Grey" Ranger Archival Inks, just to give a hint of a pattern.

I then moved on to the stamping, using Versafine Clair "Shady Lane" green in, I stamped the "Smile" sentiment and the stems for the flowers, using the Visible Image "Daisy Grunge" stamp set.  I then stamped the flower heads using Versafine Clair "Summertime" orange ink.

To colour the flower heads, I used the following Derwent Inktense pencils :Tangerine, Scarlet Pink, Persian Red and Lemon shades applied straight to the card wit the pencil.  Finally, I added some touches of white gel pen and dots of white Ranger "Enamel Accents".

Friday, 4 August 2023

Copper Tape-A-Tag embossed using die cuts


I had another play with foil tape to make an embossed tag.

I purchased two widths of sticky backed copper foil tape from Amazon, deciding to use the wider one for this tag. 

I raided my box of dies, chosing a design which had solid areas which I thought would work well.  I cut two of the same die, I have no idea of who makes this design as the packaging parted company with the die some time ago!

I used a glue stick to stick the die cuts on to the tag base.

I then tore off three lengths of copper tape and scrunched up each one.  Roughly unfolding the scrunched tape and removing the paper backing, I lay it down the centre of the tag, I then did the same with the other two lengths, placing each side of the one already on the tag. I used a craft knife to cut off the surplus.

I have a Cricut tool, I don't know what it's called, but it's idea for smoothing over the surface of the tag, paying particular attention to the raised die cut areas.  I then used a paper stump to go around the die cuts, to ensure that the die cuts stood proud from the base.  

Once I was satisfied, I used two shades of Ranger Distress Paint:  Salvaged Patina and Uncharted Mariner to achieve a more mottled look. I used a chisel shaped paint brush to apply the paint, to ensure a good coverage.  I set it aside for five minutes to dry a little.

Once dry, I buffed the surface of the tag with an old fabric rag, paying attention to the die cut areas again.  When I was satisfied with the look of it, I mounted the tag on a piece of co-ordinating card and threaded a ribbon through it.

***

If you would like to learn more about #tapeatag, why not join the Facebook group, the link is here.  It is run by Karen Warneke of Oarsum Crafts.  There is lots of inspiration in the group.

Funky Fossil Designs "Heartfelt" Anniversary Card


Here's a quick anniversary card I made this morning.  I've used the Funky Fossil Designs "Heartfelt" background stamp and a sentiment from their "Stripped Back Sentiments" stamp set, using Wow! Silver super fine embossing powder, heat set.  I've then used a banner die to cut the sentiment into shape.

Thursday, 3 August 2023

Carabelle Studio "Vintage Postcard".


It seems such a long time since I last created something with a vintage feel, that I had to address the situation. 

I have thrown a lot of products at this card, so I won't post the process, just detail the products used, otherwise you may fall asleep!

In the background I've used a Tim Holtz/Stampers Anonymoud Stencil called "Bouquet - THS143" with Tea Rose Archival Ink.

I've used a "plum" coloured Archival Ink through a Bee Crafty "D'inkable "harlequin" stencil.

I've used Carabelle Studio "Vintage Post Card" stamp with Versafine Clair "Chianti" ink, colouring the butterflies with pastel pencils.

The edges have been inked in Versafine Clair "Chianti", Distress Oxide "Tea Dye" and "Victorian Velvet" inks.

I've used the Funky Fossil Designs "Doodle Blooms" die cuts.

Other products I've used are metallic gold pen, a white gel pen and gold Liquid Pearls.

Sweet Poppy Stencils "Harmony Backplate" Happy Birthday Card


My second make of the day, this time using Sweet Poppy Stencils and stamps. 

Starting with a piece of white card, I secured the Sweet Poppy Stencil "Harmony Backplate" stencil over the top of the card with a piece of low tack tape.  I then used three shades of Ranger Archival Inks through the stencil with a blending brush, using Prickly Pear, Leaf Green and Cornflower Blue, fading the colours out towards the edges of the card.

I removed the stencil and replaced it with another Sweet Poppy Stencil, sorry I don't know the name of it, but the reference number is SP1-269 and is designed by Tracey Dutton of Lavinia Stamps for Sweet Poppy, anyway, once secured in position, I used "Cobalt" dark blue Ranger Archival Ink through the stencil, applied with a blending brush.

Finally, I added the finishing touches, stamping the sentiment (part of the Sweet Poppy "Hugs & Kisses" stamp set), stamped in Ranger Archival Ink "Cobalt" dark blue ink.  Adding a few dots of white Ranger "Enamel Accents" for a bit of dimension.

Lavinia Stamps "Midnight Meandering" rabbits congratulations card


Back to my "go to" style of crafting with Lavinia Stamps making this "congratulations card. 

I started by stamping the Lavinia Stamps "Midnight Meandering" rabbits in second generation stamping using Versafine Clair "Acorn" brown ink.

In the background, I then stamped the foliage using Versafine Clair "Shady Lane" with the Lavinia "Leaf Spray" and "Foliage Set" stamps.

I then used two shades of Ranger Archival Inks:  Leaf Green and Cornflower Blue through the Lavinia Stamps "Waffle" stencil,fading the colour out towards the edges.

I moved on to the finishing touches using gel pens and Posca Pens for the flowers.  I touched up the colour of the rabbits using Van Goch Pastel Pencils, then finally stamped the "congratulations" sentiment (part of a Simon Says "Tiny Words" stamp set) in Versafine Clair "Morning Mist" grey ink.

Wednesday, 2 August 2023

Sticky backed foil tags (Tape-a-tag)


While away at the caravan, I watched a youtube crafting tutorial by Keren Warneke of "Oarsum Crafts made by KJ", where she shared how she uses sticky backed foil tape to create decorative tags.  I was intreagued and decided I needed to have a go myself once I was back home.


In the meantime, I found that there was also a Facebook group for the tags too, the link to the group is called "Tape-A-Tag" and the link to the group is here.

I got home from the caravan this afternoon and once the first load of washing was in the machine, I sat down at my craft desk to have a play.

I was very fortunate, that I recognised the foil tape Karen used in her tutorial.  I asked Hubby if he still had some and he did, so I rescued it from the shed and the tape is now officially a craft supply and will not be returning to the shed again!


I started with a tag blank.  I cut pieces of cardboard into rough triangle shapes and used a glue stick to stick the shapes into position on to the blank tag. 

I cut off two lengths of foil tape of similar length, slightly longer than the tag length.  I scrunched each one up separately till the foil tape was a ball.  I lightly opened the tape, retaining all the crinkles, removed the backing and stuck the tape down the middle of the tag over the triangle pieces.

With the second piece of tape, again I opened it up and cut it in half, sticking half on one side of the tag and half on the other, till the tag itself was covered.  I turned the tag over and removed the excess using a craft knife.

Next I smoothed the foil over the triangle areas and used an embossing tool to detail the sections between the triangles.

I decided I wanted to replicate the colour of my favourite chocolate bar by using Ranger "Villainous Potion" purple Distress Paint, I painted over the surface of the foil, ensuring it was totally covered.  I set it aside for five minutes, then buffed the surface of the tag with a piece of kitchen roll, removing any surplus paint.

I then added the words "Spread the love" using a Clarity Stamp word sticker with a white background, before mounting the tag on a white background and using a white "hole re-inforcer" before threading silver ribbon through the tag to finish.

***

I then moved on to the silver tag.  

I used the same process of covering the tag with foil, but this time I didn't scrunch the tape, so the surface was relatively smooth. I ran an old membership card across the surface to make it as smooth as I could achieve.

Using a ruler and a ball ended embossing tool, I created vertical lines over the tag.

Next, I coated the whole tag with a black Sharpie pen.  I set it aside for a couple of minutes then buffed the surface with a piece of kitchen roll, removing the majority of the black Sharpie ink.  The result of it reminds me of the "Black Ice" technique which I tried a few years back using mirror card.

I mounted the tag on to black card stock, then added a sentiment, which is from the Clarity Stamps "Words Stickers" set.  Finally, I threaded a silver ribbon through the hole.

#tapeatag


Tuesday, 1 August 2023

52 Week Mini Art Card/Tag Challenge - Taster tag for August 2023


52 Week Mini Art Card/Tag Challenge

To start getting us in the mood for making tags in 2024, I thought I would initially provide you with a prompt on the 1st of the month, between now and the start of the challenge in 2024, so just one tag a month for the time being.

You can use any size of tag for this challenge.  The tags that I use meaure 8cm across and have a length of 16cm.  They can be purchased from Craft Obsessions for £5.75 for a pack of 50 tags.  Alternatively use any tags you may already have or perhaps cut and make your own tag bases.  The choice is yours.

The prompt for the August 2023 Tag Taster is "Circles".

I hope you enjoy this taster.  I hope you enjoy the challenge.  I'd love to see what you make.  You can share your tag within the "Crafting Niche - 52 Week Mini Art Card/Tag Challenge" group over on Facebook, here is the link.

Sam x

*********

This is how I made my tag using the August 2023 prompt of circles.


In an attempt to stash bust - using up things floating around the craft room, I found a piece of patterned paper with a circular design on it.  I cut it down to size and stuck the patterned paper on to my tag base using double sided sticky tape.

I used Versafine Clair "Nocturne" black ink to stamp the Visible Image flower from their "Creative Chaos" stamp set.  I then stamped the flower head only on an off cut of cerise coloured card.  I fussy cut the flower head and set aside till later.

Next, using the Versafine Clair "Blue Belle" ink, I stamped the collection of mixed circles twice across the tag, going over the upper part of the flower head too. The circles are part of the Visible Image stamp set called "Butterfly Effect". I used a Derwent Inktense Pencil (called Denim), to paint the colour within the circles, chosing to cover some in a lighter and some in a darker shade of blue. At this stage and while the ink was out, I inked up the outer edges of the tag too.

Once the surface of the tag was dry, I then stuck the cerise flower head over the top of the one on the tag, I used a wet glue for this so that I could slide it into position with ease.

Finally, I added some extra black dots using Ranger "Enamel Accents".  I then added a trail of pink dots using some Liquid Pearls called "Dazzle.

Once everthing was fully dry, I then mounted the tag on to a piece of blue card.  This is because I like the finished look the tag has.  It also provides a bit more strength to the tag.