52 Week Mini Art Card/Tag Challenge

Thursday, 23 February 2023

Clarity Crafts "Leafy Strip" Stencil Card


I made another card this evening, using a Clarity Stamps stencil called "Leafy Strip".

I masked off the edges of a card, then used Elements Inks from the bottom right hand corner gradually fading out around the middle of the card.  The shades of ink I used were Bermuda and Greensleeves.

Through the Clarity "Leafy Strip Stencil" I used Elements Pine and Mermaid.

I used a gold metallic pen to add extra detail then a Star Dust Gelly Roll Pen around the foliage.  Finally, attaching a Tim Holtz word sticker for the sentiment.

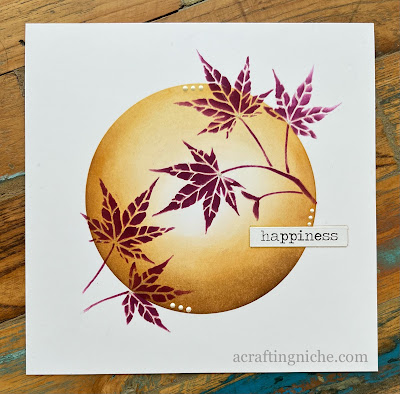
Sweet Poppy Stencil "Maple Leaf" Card


I was about to start sewing some shorts, when I had an urge to make a card.  This card emerged really quickly without any thinking.  It rarely happens like this for me! 

I used a 6" square piece of white card and lay the Sweet Poppy Stencil "Aperture Circle" over the top, securing in position with a piece of low tack tape.

I used a selection of Elements Inks to blend within the circle, starting with Sundance, followed by Sahara, Russet Orange and then Truffle.  I only used the Truffle, which is the darkest of the inks used at the bottom edge of the circle.  I deliberately left the middle of the circle almost bare of ink.

I removed the stencil, then positioned the Sweet Poppy Stencil called "Maple Leaf" over the circle, using a different Element Ink "Mulberry" through the stencil.  I repositioned the stencil and repeated the process.

Using a "Star Dust" Gelly Roll Pen, I coloured in the veins of the leaves, sadly this subtle shimmer doesn't show on the photograph.

I didn't fancy stamping a sentiment, so rummaged through my stash and found a Tim Holtz Idea-ology word sticker book, so stuck the "Happiness" sticker on to the card and edged it in the same Gelly Roll Pen. Finally, I used Ranger Enamel Accents in white in three areas of the card.

Wednesday, 22 February 2023

Visible Image "Hope" Card


Sharing another card, this time featuring Visible Image stencils and stamps. 

I started this card using three shades of Elements Inks (Sahara, Greensleeves and Bermuda) on a glass mat, spritzing with water then swooshing a piece of white card through the ink.  I added extra colour in a few areas to make it a little stronger, by repeating the process.  I then used a heat gun to dry the surface.


Once dry, I used the Visible Image "Strobes" stencil with "Peat Moss" Archival Ink. I then used "Library Green" Archival Ink through the Visible Image "Super Nova" stencil.  I used "Cornflower Blue" Archival Ink through the "Halftone" stencil ina couple of areas around the edge of the card.

Using Versafine Clair "Shady Lane" green ink, I stamped the Visible Image "Fibonacci" image.

I ran an anti-static bag over the surface of the card, before stamping the word "Hope" (from the Visible Image Peace, Love and Hope stamp set) in Versafine Clair "Twilight" dark blue ink.  I then coated the stamped word in Wow! clear embossing powder and heat set.

Using the same ink and the edge of the large stamp from the Visible Image "Stay Wild" stamp set, I repeated the process around the edge of the card.

I used a white pastel pencil to lighten a couple of areas.  Addeing touches of yellow Posca Pen, White Gel Pen and a shimmer of gold using a gel pen.  I then mounted it on to a piece of white card.

Funky Fossil Designs "Honey Bees" stencil card


After making the "busy" previous card, I wanted to make something with lots of white space, so made this card. 

I masked off a diamond section of the Funky Fossil "Honey Bees" stencil, then positioned the stencil over a piece of white card, held in place with a small piece of low tack tape.

Through the diamond shaped masked area, I applied "Shadow Grey" Archival Ink.  Once the stencil was lifted, I added a touch of colour using a Derwent Inktense pencil.

Using the Funky Fossil "Small Print #2" stamp set for the sentiment, stamped in Versafine Clair "Morning Mist" grey ink.

I added touches of shimmer to the wings of the bees using a "Clear Star" Gelly Roll pen.  Then mounted the card onto a piece of yellow card then on to a card blank.

Tuesday, 21 February 2023

An inky Clarity stencil play session


I was recently reminded that I have a few Clarity Stencils which have not seen the light of day for at least a couple of years.  As I have been away for a few days, I was keen to get inky again, making this card.   The still photo doesn't really do it justice, so I've taken a little video too.


Because some of my Clarity crafting stuff has been around for a while, I didn't write the name of the stencils on the packs, so that will be a little job for tomorrow, so for now, you'll just have to enjoy the card without description.

Wednesday, 15 February 2023

Funky Fossil "Queen Bee" Birthday Card


Today, I've been playing with my Funky Fossil goodies to create this card. 

To start, I put three shades of Element's Inks on to my glass mat, I used Sundance, Confetti and Mulberry.  I then spritzed the ink and lay a piece of card over the ink.  I picked the card up and moved the diluted ink around on the card, till I was happy with the colour coverage. I used my heat gun to fully dry the inked card.

Once dry, I rubbed an anti-static bag over the surface of the card and lay the Funky Fossil "Geometric Circles Stencil" over the top, securing with a bit of low tack tape.  Using a finger dabber and Wow! Clear embossing ink pad, I coated the gaps in the stencil.  Removing the stencil, I then coated the inked image with Wow! "White Puff Twinkle" embossing powder and heat set.  

Next I positioned the Funky Fossil "Honeycomb Background Stencil" and used "Orange Blossom" Archival ink around the heat embossed area.

I then positioned another Funky Fossil stencil, called "Hex Dots" and applied "Vibrant Fuchsia" Archival Ink through the stencil to create a dotty design.

I inked the edges of the card with Versafine Clair "Charming Pink" ink.

In the middle of the heat embossed flower, I have used two shades of Paper Artsy Fresco Finish Acrylic chalk paint (Cerise and Candy Floss) applied with a dotting tool.  Once the middle was dry, I used white Ranger Enamel dots to creats the centre of the flower.

While everything was drying, I turned my attention to the bee, which is part of the Funky Fossil "Queen Bee" stamp set.  I stamped the bee in Versafine Clair "Nocturne" black ink, then quickly coated it with Wow! Clear Embossing Powder and heat set.

I coloured the Bee with a mixture of Posca Pens and Derwent Intense Water colour Pencils and then fussy cut it.  To elevate the Bee from the card, I cut a slim strip of card and adhered it to the underside of the bee.

Using Versafine Clair "Nocturne" black ink, I stamped the Happy Birthday sentiment which is part of the Funky Fossil "Happy Words" stamp set.  I layered the card on to a card base and then glued the Bee into position over the flower.


Visible Image "Butterfly Effect"


A couple of days ago, I watched an Eileen Godwin live demo on a Facebook group.  As I had most of the items she used, I decided to do a "lift" of her work and this is a result.  The demo was an hour long.  I'm not going to go into detail how I made it, but have listed some of the items used below:


Visible Image Butterfly Effect stamp set

Visible Image Peace, Love and Hope stamp set

Funky Fossil Designs Vintage Script stamp

Visible Image Butterfly Ink stencil

Visible Image Breakout stencil 

Visible Image Supernova stencil 

Visible Image Strobes stencil

Wow! Clear Embossing ink pad

Wow! Rich Gold Embossing Powder

Archival Ink Thistle

Archival Ink Orange Blossom

Archival Ink Library Green

Archival Ink Cornflower Blue

Archival Ink Red Geranium

Archival Ink Bluebird

Versafine Clair "Nocturne" ink

Versafine Clair "Twilight" ink

Ranger Glossy Accents

Ranger Enamel Dots

Van Goch Pastel Pencils

Colouring Pencils

Gel Pen


Funky Fossil Designs "Queen Bee" Card


 Funky Fossil Designs recently released a new stamp set, which I knew I had to have.  It's called "Queen Bee" and is designed bu "Mo's Art UK".  It features a big fat bumble bee which I fell in love with.  Strangely, when the stamp set arrived the first card I made using the set, didn't feature the Bee!

To make this card, I used a circle mask with two shades of Distress Oxide Inks:  Lost Shadow and Iced Spruce, only using the Iced Spruce colour at the lower section of the circle.

I then stamped the foliage and the crown from the "Queen Bee" stamp set in Versafine Clair "Morning Mist" using second generation stamping.

Using the same ink, but in first generation stamping for the wording in the middle of the circle.

Around the edge of the stamped area I used the same shades of Distress Oxide inks (Lost Shadow and Iced Spruce), but used the Funky Fossil "Hex Dots Stencil" to add some extra interest to the border.

I coloured the foliage wreath and the crown using Derwent Inktense water colour pencils.  I added touches of gold shimmer pen to areas and then topped the berries in the foliage with dots of Ranger Glossy Accents

Tuesday, 14 February 2023

Lavinia Stamps "Indra the Moth" on an archival ink background


Inspired by a demo by Eileen Godwin, I created this card.  For the base colour, I used three shades of Elements Inks:  Sundance, Confetti and Della Blue.

Here's a short video clip which shows the glittery surface of Indra.


I used Wow! "Mistletoe Magic" embossing powder and their clear ink pad to stamp the moth image and then heat set.

I used Archival Inks through several Lavinia Stamps stencils:  Dynamic, Elegance and Posy.  Using White Pan Pastel through "White Orbs" stencil.

Using "Purple Delight" Versafine Clair ink, I stamped the "See a fairy make a wish" verse.

I stamped the "Inspire" word, part of the Lavinia "Inspire Me" stamp set in Versafine Clair "Nocturne" black ink.

I inked the edges of the card twice.  The first time using "Twilight" dark blue ink creating a broader coloured edge, then on the very edge, I used "Nocturne" to make the whole thing stand out a bit more.

I used a white Signo gel pen on the moth to highlight some of the design on the moth. 

I then used white and black enamel accents for extra detail, finally mounting the card on to a white card blank.


Friday, 10 February 2023

Wow! Embossed Heart Valentine's Card


It's hard to believe that Valentine's Day is next week, it seems to have come round so quickly, so I thought I'd better get crafting, making a card for my Hubby.

I die cut three hearts from a sheet of card,  I glued two together and set aside for later.  With the remaining one, I had a play with several colour of Wow! Embossing Powders getting a lovely melted mingle of colours.  I used "Love is the drug", "Earthtone Blueberry", "Rich Gold" and "Silent Night" (which has some glitter in with the embossing powder.  

Between each colour, I heat set then once cool, applied more embossing ink before applying the next colour. The more times I did it, the longer the powder would take to become liquid, but when it did, the heat gun was able to move the colour around the heart.

For the final coat, I used Wow! Clear embossing powder to give an extra glossy finish to the heart.  Once it was dry, I glued it to the other heart(s) so that it had a strong base, then added foam pads to the base of the heart.

I then moved on to the card base, creating a card blank measuring four inches square.  Using the same white card, I die cut two squares one with a plain edge and one with a stitched edge.  

I adhered the plain square on to the prepared card blank. I then put the stitched edged square through a Cuttlebug embossing folder with a small dot designs and ran it through the Big Shot. I then adhered the embossed square over the plain one on the card base.

In my craft stash, I found some white die cut leaves using the Sizzix/Stampin' Up "Pretty Pines Thinlits Die Set", so I used those and glued them into position on the card.  

Before I added the heat embossed heart, I stamped the words  "Love You" using the Simon Says Stamp "Tiny Words - Encouragement" stamp set, stamped in Versafine Clair "Morning Mist" grey ink.

Finally, I popped the heat embossed heart in the middle of the card and added some sticky backed gems to some of the foliage.

Lavinia Stamps "Mideela" Birthday Card


Like many paper crafters, I strunggle to make cards suitable for males, when you add to that the pressure of creating for a close family member and the need to get the card in the post, my stress levels get high. This was the situation I was in this morning, resulting in this clean looking card using Lavinia Stamps.

I used the Lavinia "Circle mask" blending four colours of elements inks (Sundance, Russet Orange, Paprika and Graphite) to create the central coloured image

I stamped the small Lavinia dragon called "Mideela" and the sentiment from the "Welsh Words" stamp set in Versafine Clair "Nocturne" black ink.  I added small dots of a gold shimmer gel pen to areas of the card too.

Tuesday, 7 February 2023

Funky Fossil "Shellebrate" postage stamp card


I've had a few days of no crafting but lots of reading, which has been lovely, but this afternoon I had the urge to make something, so created this card using a selection of Funky Fossil Design goodies.

I started by die cutting the inner and outer edge of the postage shape stamp, using the Funky Fossil "Happy Mail Die Set" with white card.

Using the inner piece (the one with the straight edges), I stamped the snail from the Funky Fossil "Shellebrate" stamp set, using Versafine Clair "Morning Mist" grey ink. I then stamped the same image on a post-it note, fussy cutting the shape to create a mask for the snail, which I lay over the stamped image on the white card.

Using Versafine Clair "Morning Mist" grey ink I stamped the Funky Fossil "Wonky Candles".  I then lifted started to colour in the background, using a mix of "Tumbled Glass" and "Twisted Citron" Distress Oxide inks.  

Next, I lifted the mask and started colouring in the snail, using a mix of Distress Oxide inks (Pumice Stone, Weathered Wood, Hickory Smoke, Mowed Lawn and Blueprint Sketch) and an assortment of Posca Pens.

I coloured the candles using various colours of Posca Pens, then outlined the snail using a fine point marker pen.  I grounded the snail using a pastel pencil and added some white highlights to various areas.

I used "Blueprint Sketch" Distress Oxide Ink to edge both the inner and outer areas of the two die cut pieces of card.  I then mounted the coloured image on to the perforated edge and stuck it on to a white card blank.  

The sentiment is part of the Funky Fossil "Small Print" stamp set, which was stamped in Versafine Clair "Morning Mist" grey ink. 

Finally, I added Ranger "Glossy Accents" to the eyes and the shell of the snail and set aside to dry.  This created a more three dimensional look to the card.

Thursday, 2 February 2023

A sparkly Lavinia Stamps "Darcy" card


I have made a super sparkly card and the photograph just doesn't do it justice, so I've made a little video clip to share its full beauty.


I started this card by heat embossing the Lavinia Stamps "Star Cluster" using Wow! clear embossing powder.

Using a clending brush and "Blueprint Sketch" Distress Oxide Ink, I gently blended the colour from the edges towards the middle, going very lightly over the heat embossed stars so that the colour was hardly visible.  I then gave the stars a light rub with a soft cloth to remove any ink that may have settled on the surface.

Using a fan shaped paint brush and a little bit of water, I added splatters to the area around the star cluster, then blotted with a piece of kitchen roll.  This gives a lovely delicate detail to the background, without it being too obvious.  I then gave it a quick blast with the heat gun to ensure the surface was dry.

I stamped the Lavinia Stamps "Darcy" figure in Versafine Clair "Twilight" dark blue ink.

I then used the Lavinia "See a fairy, make a wish" verse with Versafine Clair "Twilight" ink, stamped in second generation to add text to the area around Darcy and the Star Cluster.

I used a piece of torn copy paper and Versafine Clair "Twilight" ink with a finger dabber to ground Darcy and to create the impression of the landscape behind her.

I used a gold shimmer gel pen to outline Darcy.  I then used a silver glitter gel pen and a white Signo pento add a few dots of white and silver to the star cluster and to the wing area of Darcy.

I edged the card using "Chipped Sapphire" Distress Oxide Ink and then mounted on to a dark blue card then on to a white card blank.

Using a Quickie glue pen, I added a few dots of glue then added a very light sprinkle of Lavinia Holographic silver glitter.  Finally adding a few holographic silver stars I've had in my stash forever.

Wednesday, 1 February 2023

Funky Fossil "Shellebrate" Birthday Card


I've had a few days away at the caravan, it's nice to have a break from crafting and great to get back to it once home. I have a few birthday cards to make for February.  This one needs to go in the post, so was the first on my list to make.

Using two sets of Funky Fossil Design Stamps:  "Shellebrate" and "Flowery Felines" both designed by the super talented "Donna Gray". I started by stamping the three main images in to position on a piece of white card, using Versafine Clair "Morning Mist" grey ink.  

I then stamped the same images on another piece of white card using the same ink, but this time not over lapping the images. The reason for me doing this was should my colouring go wrong, I'm not ruining all the work I have done, only one section, which I could then stamp and colour again.  

I coloured these stand alone images using a mixture of products:  Derwent Inktense Water Colour Pencils, Gel Pens, Posca Pens and a 2B Pencil too.

Returning to the other card with the stamped images over lapping, I created the background, using "Twisted Citron" and "Mowed Lawn" Distress Oxide Inks for the lower section and "Tumbled Glass" Distress Oxide ink for the sky.  I then inked the edges of the card using "Blueprint Sketch" Distress Oxide Ink.

Using the bunting image from another stamp set designed by Donna Gray for Funky Fossil called "Let's Party" with "Morning Mist" Versafine Clair ink I stamped the bunting a couple of times to meet in the top middle of the card. I used Posca Pens to colour in the bunting.

I then added the "Happy Birthday" sentiment, part of a Lawn Fawn set called "Simply Sentiments", stamped in Versafine Clair Blue Belle" mid blue coloured ink.

Returning to the sheet of coloured in stamped images, I fussy cut all the shapes then adhered into position on to the card. I outlined a lot of the images with a silver glitter Signo Pen, in some instances smudging the pen line to get a more subtle shimmer look.

I added flowers using Posca Pens to the grass area at the foreground and then added Ranger "Glossy Accents" to the eyes and to the shell of the snail shell to provid a more three dimensional look and set aside to dry over night.