52 Week Mini Art Card/Tag Challenge

Copywrite / Privacy

Thursday, 30 June 2022

Lavinia Stamps "Hare" Tag


I've been playing with my Lavinia Stamps again today, creating this gift tag.  I've used a gel plate background,using bubble wrap to create the pattern in the background.

I've stamped in Versafine Clair "Nocturne" black ink using the following three Lavinia Stamps:  Birch Tree, Fairy Hive Set and Wild Hare Set.

I've used a black Van Goch Pastel Pencil for the shading and Posca Pens to create the look of flowers.

Wednesday, 29 June 2022

Funky Fossil Designs "Celestial" on a "Funky Circle" background card


Today I have had a play with the Funky Fossil Designs "Celestial" stamp set  which happens to be reduced by £1.50 at the moment, so this is maybe an ideal time to grab a bargain. 

I stamped the central image in Versafine Clair "Twilight" ink, then coated the stamped image in Wow! Clear Embossing Powder and then heat set.

I used Antique Linen and Tumbled Glass Distress Oxide inks to fill the central stamped image.  Using a circle mask, I covered the stamp image.  I used the new Tim Holtz "Unchartered Mariner" Distress Oxide ink through the Funky Fossil "Funky Circle Stencil". to create the additional detail around the stamped area.  Using the remaining ink on the blending brush to provide a light colour in each corner.

Using a fan shaped paint brush, dipped in water, I then lightly tapped the brush so that droplets formed in the corner areas, dabbing the wet area dry with kitchen roll, this created the mottled look you can see.

Finally, I stamped the sentimen, also part of the "Celestial stamp set" in Versafine Clair "Twilight" ink.

Lavinia Stamps "Feather" and gilding flake card


I've been playing with a Lavinia Stamp this morning, stamping the "Feather" in Versafine Clair "Twilight" dark blue ink over a Distress ink and stencilled background (using the Lavinia "Posy stencil".

I have added gilding flakes to area of the card to provide additional dimension.

I have used a Simon Says Stamp from thier "Tiny Words - Birthday" for the sentiment.

Tuesday, 28 June 2022

Funky Fossil "Abstractions" Thank you Card


I've been playing with a Funky Fossil Designs stamp set called "Abstractions" to create this card.  I've stamped in two shades of Versafine Clair inks:  Charming Pink and Nocturne on a background where I have mopped up Distress Oxide Inks from my glass mat. I've used black and white Posca pens for highlights.

I've used a Funky Fossil Designs "thank you" die, cutting white card for the central sentiment.

Ranger Tim Holtz "Unchartered Mariner" Distress Oxides


I recently received my pre-order (From Art From The Heart( of the new Distress Oxide Shade called "Unchartered Mariner".  I mentioned to a friend about it and she asked the difference between the existing blue shades in the range, compared to the new ones.


With this in mind, I made a colour chart to share with her and I thought this might be handy for anybody else thinking the same.

Monday, 27 June 2022

Lavinia Stamps "Seeing is believing" cards


About a month ago, a lady commented on one of my Lavinia Stamps makes.  In her comment, she mentioned that she was new to stamping and had purchased a couple of Lavinia Stamps, a Versafine Clair ink pad and some Distress Inks, but hadn't been brave enough to try them out.

I sent the lady a private message and discussed the issue, suggesting that she tells me which stamps she has and which colours of Distress Inks.  I then made very brief videos, just a minute long for each technique, to make the cards shown above using one of the stamps (Seeing is Believing) that she had.

I have to say I felt rewarded when in a few days time, she shared with me her first make.  I hope I have inspired her to try out more techniques.  At the end of the day, it's only time, paper and ink lost if it all goes wrong.

Monday, 20 June 2022

Bucket Hat for sunny weather


When I knew that the weather was going to be hot last week, I planned to sit out and enjoy it.  However, I burn easily and wanted a hat.  As I had Covid I wasn't able to shop for a hat so made a bucket hat following an Youtube tutorial by Love Crafts,  Here's the link if you want to have a go yourself.

I think if I were to make it again, I would make it a little smaller, but the instructions are really easy and clear to follow. I used some fabric I had purchased from Aldi to make the hat.

Unfortunately, my hat must have jinxed the weather as the next day was overcast with rain.  At least I have it for another sunny day,

Continuation of The New Hexagon Millefiore Quilt


Back in 2015, I started a hand sewn patchwork project with lots of fussy cutting, consisting of making interlocking rosettes made of hexagons.  After a while, I went right off it and the quilt got stuffed in the back of a cupboard.


Roll on seven long years I got to thinking about the project and decided I could do some hand sewing in the caravan.  It was hard to pick up where I had left off, after such a long time, but I did and I am slowing making progress with it.  I've been sewing while I have had Covid, I've not fancied and paper crafting since being poorly.  Fortunately, I am now on the mend.

This is where I am up to on the patchwork quilt.  The rosette at the top of the screen needs another round of hexagons on it and will then be attached to the piece below.


Thursday, 16 June 2022

Covid apologies

Just a quick post to apologise for not posting recently.  I have been away but now have Covid. At the moment I can not think about crafting, I just want to sleep.

Hopefully, I'll be back to normal soon x

Monday, 6 June 2022

Sweet Poppy Stencil Belated Birthday Card


I've used a couple of Sweet Poppy Stencils (SP6-122 and SP1-269) to create this card using Ranger Archival Inks. 


I used the following Archival Inks through the "Plaid" background stencil:  Buttercup, Chrome Yellow, Sunflower, Tiger Lily and Bright Tangelo, using "Plum" Archival Ink through the floral stencil.

I've used a gel pen to add some golden shimmer, unfortunately the photograph doesn't pick any of it up.  As it is not sunny outside, I've not been able to take a video clip of it either.

For the sentiment I have used a stamp by Simon Says Stamp from their "Tiny Words - Birthday" set, stamped in Versafine Clair "Chianti" dark red ink.

Sunday, 5 June 2022

Lavinia Stamps "Fantasea" New Baby Card


This evening I had a play, making this baby card.

I masked a circle area off in the middle of the card blank, then used the stars, part of the Lavinia Stamps "Words 2 Stencil", using three shades of Ranger Archival Inks (Chrome Yellow, Vivid Chartreuse and Garden Patina).

Removing the circle mask, I shaded the white circle using "Sky Blue" Ranger Archival Ink. I then stamped the Lavinia "Fantasea" boat using Versaifne Clair "Morning Mist" grey ink.  I used the same ink to stamp the sentiment, which is part of a Personal Impressions stamp set.  I used one of the hares from the "Wild Hare Set", setting him in the boat, using Versafine Clair "Acorn" brown ink.

I coloured the central image using Van Goch Pastel Pencils.  I used a white gel pen to add highlights.

Lavinia Stamps "Dancing Till Dawn" Card


Today I've opted to make a card with white space.

I've used two shades of Ranger Archival Ink (Vivid Chartreuse and Sky Blue) through the Lavinia Stamps "Ambiance" stencil fading the colour out towards the edges to create the background.

Using Versafine Clair "Twilight" dark blue ink, I stamped the Lavinia "Dancing Till Dawn" fairies. I created a landscape for them to stand on using Versafine Clair "Morning Mist" grey ink, using the same ink to stamp the "Heartfelt Verse" sentiment.


Saturday, 4 June 2022

Tag Book Cover for "24 Days of Tags 2021" Challenge with Karen Telfer


I am trying to tick off things on my list that need to be done/completed.  One of the items was to make a cover for the 2021 "24 Days of Tags" challenge with Karen Telfer.  I had made all the tags, mounted them on to black card, but never got round to making a cover for them.  So I decided to address that today. 


I used the Lavinia Stamps "Confetti" Elements Inks with their "Splendour" stencil to create the background design.

Using Versafine Clair "Morning Mist" grey ink, I stamped the Lavinia "Bell Flower Vine" stamp, colouring with Distress Oxide inks applied with a brush.

I die cut the 24 and printed the text on the computer before mounting and adhering on to the tag.


Lavinia Stamps "Maka the wolf"" and the owl card


I don't usually make cards for other people.  I don't like the pressure it puts me under and there is obviously the fear of disappointment that I've not made what they wanted.

Last night I received a message asking if I could make a wolf card for a special occasion in a month.  I reluctantly agreed.  As I was up early this morning, I decided to make the card, so it was done and out of the way, instead of me spending time fretting about it.  This is the card I made.

I used a spray ink Dylusion spray ink background from my stash that I had made some months previously. I used my Van Goch Pastel Pencils to add a bit more colour to a few areas too.

I used Versafine Clair "Nocturne" black ink with an assortment of Lavinia Stamps, including "Maka the wolf", Woodland Fern, The Red Pines and Foliage Set. I also used Gel and Posca Pens for colour and highlights.

I used a sentiment from a Simon Says Stamp set called "Tiny Words Encouragement" also stamped in "Nocturne" black ink.


Friday, 3 June 2022

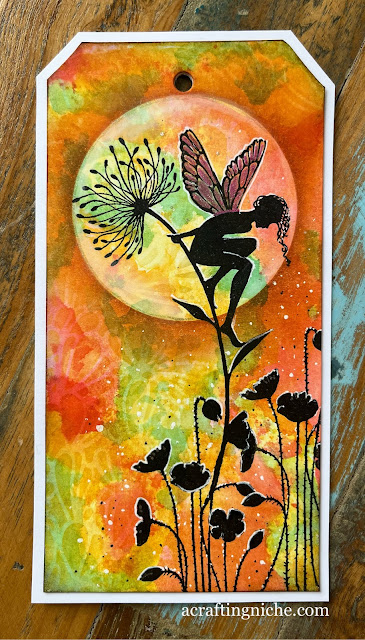
Lavinia Stamps "Seeing is believing" tag


I've had a few days off crafting recently as we have had family visiting.  Today I had a need to stamp, making this tag.

I used a background from my stash, which I'd created by mopping up surplus Distress Oxide inks from my craft mat.

I used Versafine Clair "Nocturne" black ink to stamp the two Lavinia Stamps "Seeing is believing" fairy and the "Wild Poppies". I then used the Lavinia "Ambiance" stencil to add a subtle detail around the stamped area.

I used a mask to create the moon with archival inks around the edge and added a few touches of a white Van Goch Pastel Pencil to lighten one side.

I used a white gel pen to highlight areas and to add some white dots around the poppies.